

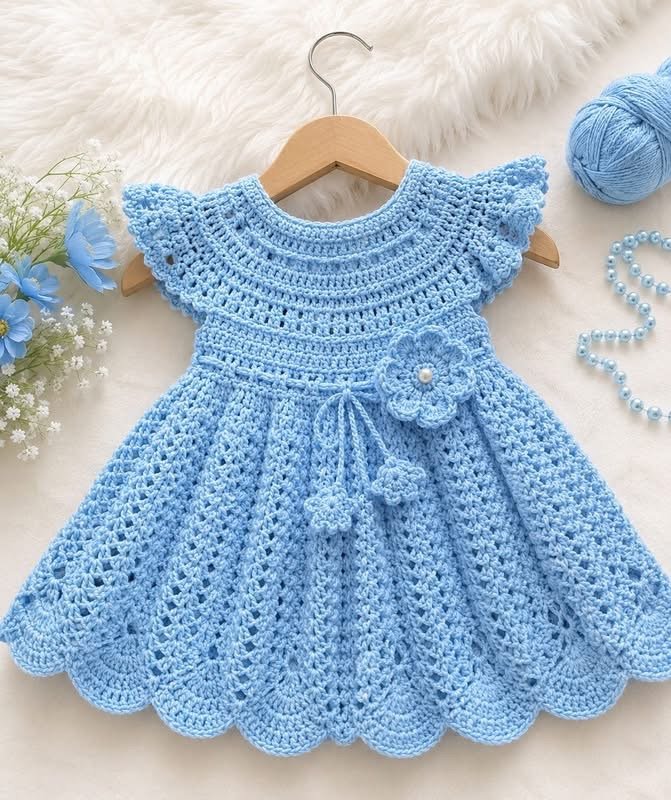
Yes. The dress in your photo can be recreated with crochet. It appears to be a top-down baby/toddler dress with a round yoke, lacy skirt, ruffled sleeves, scalloped hem, a waist flower, and small hanging flowers.
Because a photo cannot reveal the exact original stitch counts, the pattern below is a close, adjustable version.
Crochet Blue Baby Dress Pattern
Skill level
Intermediate beginner
Materials
- Light blue DK or sport-weight yarn
- Crochet hook appropriate for your yarn, usually 3.0–3.5 mm
- Yarn needle
- Scissors
- 2 small buttons or snaps for the back
- Small pearl or bead for the flower center
Main stitches
- ch = chain
- sl st = slip stitch
- sc = single crochet
- hdc = half double crochet
- dc = double crochet
- sk = skip
- V-stitch = dc, ch 1, dc in the same space
- shell = 5 dc in the same space
1. Crochet the Neckline
Start at the neckline and work downward.
Chain enough stitches to comfortably fit around the child’s head. For approximately 6–12 months, you can start with around 72 chains, joining carefully with a slip stitch.
Work several rounds of single crochet or half double crochet around the neckline.
Keep the neckline slightly loose so the dress can be put over the child’s head.
Yoke Round
Work:
3 dc, ch 1, skip 1 stitch around the round.
On the following rounds, work your increases at regular intervals. This creates the circular yoke visible in the photograph.
Continue increasing until the yoke reaches approximately:
5–6 inches from the neckline for a small baby size.
The exact depth depends on the child’s measurements.
2. Create the Decorative Yoke
The photograph has several horizontal decorative bands.
For one of the openwork rows, try:
dc in next stitch, ch 1, skip 1 stitch, repeat around.
For the following row, work dc stitches into the chain spaces.
Repeat this combination for several rounds.
For a more decorative band, work:
V-stitch in the next chain space, skip 2 stitches, V-stitch in the next space.
This produces the openwork pattern seen across the upper portion of the dress.
3. Separate the Sleeves
Once the yoke is wide enough to reach from shoulder to shoulder, divide the work into:
- Front
- First sleeve
- Back
- Second sleeve
Chain across the underarm section rather than continuing around the sleeve.
This allows the body to hang freely while leaving openings for the sleeves.
Join the front and back sections and begin working the skirt in rounds.
4. Make the Full Skirt
The skirt needs to become progressively wider.
Start with a round of double crochet.
On the next round, increase regularly by working two stitches into selected stitches.
For the open lace pattern, use:
V-stitch: dc, ch 1, dc
Then skip 1–2 stitches between V-stitches.
Continue working rounds of V-stitches.
Every few rounds, increase the number of stitches by placing additional V-stitches between the existing ones.
This creates the lovely full, flowing skirt shown in your picture.
5. Create the Vertical Lace Pattern
For the textured columns visible in the skirt, alternate rows such as:
Row A: dc around
Row B: V-stitches around
Row C: dc around
Row D: V-stitches around
You can also work groups of 3 dc separated by chain spaces to make the vertical openwork more pronounced.
Continue until the skirt reaches your desired length.
For a baby dress, measure from the shoulder down to the desired hem rather than relying only on a stitch count.
6. Crochet the Scalloped Bottom
The bottom edge in the photograph has large rounded scallops.
Try:
sc in next 5 stitches, skip 2 stitches, 7 dc in next stitch, skip 2 stitches.
Repeat around.
This creates the large shell-shaped scallops.
For a slightly smaller scallop:
5 dc in one stitch, skip 2 stitches, sc in next stitch.
Finish with a round of slip stitches or single crochet.
7. Make the Sleeves
Return to one sleeve opening.
Attach yarn under the arm and crochet around the opening.
Work several rounds of:
hdc around
Then add a decorative openwork row using:
dc, ch 1, skip 1
Finish the sleeve with a ruffled edge.
For the ruffle, work:
5 dc in one stitch, skip 1, sc in next stitch
Repeat around the sleeve.
This gives the sleeve the pretty flared appearance in the photograph.
Repeat for the second sleeve.
8. Crochet the Waist Flower
The large flower on the front is made separately.
Flower
Make a magic ring.
Work:
5 sc into the ring.
Close the ring.
For the petals, try:
sl st, ch 2, 3 dc, ch 2, sl st
Repeat around to create five petals.
For a fuller flower, use 5 dc instead of 3 dc.
Sew a small pearl or bead into the center.
Attach the flower near the waistline.
9. Make the Hanging Flower Ties
The photograph also has two small flowers hanging from cords.
Make a long chain approximately 8–10 inches long.
Slip stitch back along the chain.
Attach a small crocheted flower to the end.
Make two or three of these cords and sew them beneath the waist flower.
10. Finishing the Dress
Weave in all loose ends.
If you want a back opening, leave a small opening at the back of the neckline and add two buttons or snaps.
Lightly block the dress so the lace pattern opens nicely.
Do not stretch it excessively; just shape the skirt and scallops while damp and allow it to dry flat.
To Make It Larger
The easiest way to resize this dress is to change the yoke circumference, rather than simply adding length.
Measure the child’s:
- Neck circumference
- Shoulder/chest circumference
- Arm circumference
- Shoulder-to-waist length
- Waist-to-hem length
Then increase the yoke until it reaches the desired chest measurement.
For a larger toddler size, continue the skirt increases for additional rounds.
A good construction formula
Neck → circular yoke → divide sleeves → increase skirt → scalloped hem → decorate with flower.