

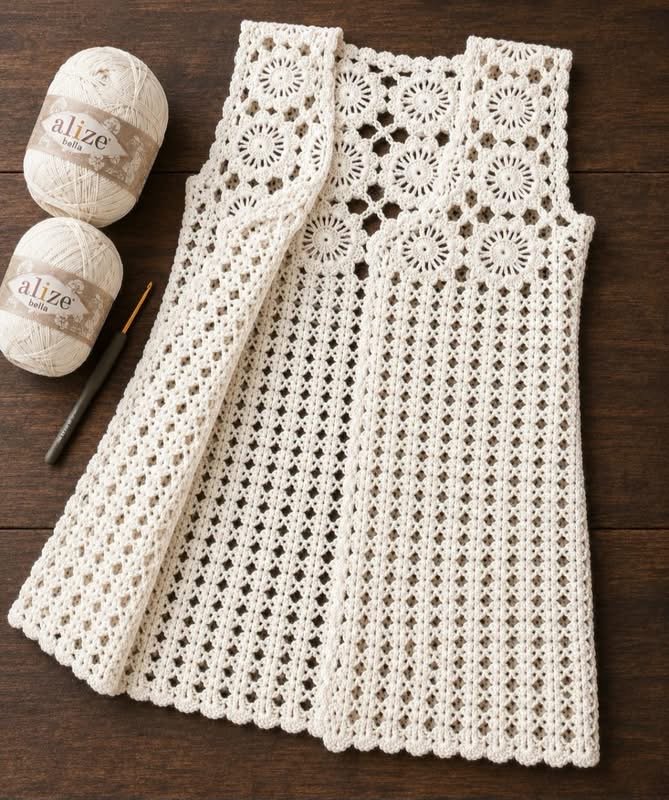
Crochet Lace Vest Pattern
Materials
- Fine cotton yarn, approximately 500–700 g depending on size and length
- Crochet hook around 2.0–2.5 mm
- Scissors
- Tapestry needle
- Stitch markers
A fine cotton such as Alize Bella is suitable for this type of openwork garment.
Main stitches
You will use:
- Chain stitch (ch)
- Slip stitch (sl st)
- Single crochet (sc)
- Double crochet (dc)
- Treble crochet (tr)
- Chain spaces
- Cluster stitches
The exact stitch count will depend on your size.
1. Make the Back
Start at the bottom of the vest.
Make a foundation chain approximately the width you want your finished vest to be.
For example, for a medium size, start around 150–170 chains, then adjust after making a small gauge swatch.
First section
Work several rows of an open lace pattern such as:
Row 1:
Dc in the 4th chain from hook, ch 1, skip 1 chain, dc in next chain. Repeat across.
Row 2:
Ch 3, turn. Dc in each dc with ch-1 spaces between the stitches.
Continue the openwork pattern until the piece measures approximately 25–30 cm from the bottom.
This creates the long vertical lace pattern seen on the lower portion of the garment.
2. Create the Vertical Flower Columns
The photograph has narrow decorative columns running vertically.
For each column, work approximately:
ch 3, skip 2, sc in next space, ch 3, skip 2, dc in next space
Repeat this arrangement across the row.
On subsequent rows, work your stitches into the chain spaces rather than directly into the previous stitches.
This creates the small diamond-like openings visible throughout the lower part of the vest.
Continue until the back reaches the desired length.
3. Make the Flower Motifs
The most distinctive feature is the large circular flower motifs across the upper section.
Make each flower separately.
Center
Start with a magic ring.
Round 1:
Work 12 dc into the ring. Join with a slip stitch.
Round 2
Ch 3.
Work 1 dc into the same stitch, then 2 dc in each stitch around.
Join with a slip stitch.
Round 3
Sc in next stitch, ch 4.
Repeat around.
Join.
Round 4
Work several dc stitches into each chain-4 space to create the petals.
For example:
sc, 5 dc, sc in each chain space.
Repeat around.
You should now have a flower resembling the circular motifs in the photograph.
4. Openwork Around the Flowers
The flowers in the picture aren’t simply sewn onto the vest. They appear to be connected with small open chain spaces.
Around each flower, work:
sc, ch 3, sc, ch 3
between the petals.
When joining two flowers, connect the chain spaces with slip stitches.
This produces the little diamond-shaped openings between the flowers.
Make enough flowers to cover the upper back and front.
For the pictured design, the upper section appears to use approximately 12–16 large flower motifs, depending on size.
5. Front Pieces
The front is divided into two sides with the neckline opening in the center.
Work the lower lace section exactly like the back.
When you reach the upper section, begin incorporating the flower motifs.
Leave the center portion open for the neckline.
For a rounded neckline, gradually decrease the number of stitches toward the center.
For a straighter neckline like the photograph, leave a wider opening and finish the edge with several rounds of chain-space lace.
6. Shoulder Construction
The photograph shows relatively narrow shoulder sections.
Once the front and back are finished:
Place the pieces together with the wrong sides facing.
Join the shoulders using slip stitches or single crochet.
Leave the armholes open.
Try the vest on before permanently joining the shoulders so you can adjust the width.
7. Join the Sides
Starting at the bottom edge, sew or crochet the front and back together.
Stop when you reach the armhole.
For the style shown in the photograph, leave a generous arm opening rather than making the side seam reach all the way to the shoulder.
8. Armhole Border
Work around each armhole:
Round 1: sc evenly around.
Round 2: sc, ch 2, skip 1 around.
Round 3: Work small shells or picots into the chain spaces.
This gives the armholes the delicate scalloped finish seen on the garment.
9. Bottom Border
The bottom of the pictured vest has a beautiful scalloped edge.
Work one final decorative round:
sc in next space, skip 2 stitches, 5 dc in next space, skip 2 stitches
Repeat around the entire bottom.
Finish with a slip stitch.
You can make the scallops larger or smaller depending on how decorative you want the edge.
10. Neckline
Finish the neckline with 2–3 rounds of delicate lace.
A simple option is:
Round 1: sc evenly around.
Round 2: sc, ch 3, skip 2 around.
Round 3: sc into each chain space, with a small picot every few spaces.
This keeps the neckline light and feminine rather than making it too heavy.
Important Tip for Matching the Photo
The flower motifs should be made first and then connected with chain spaces, while the lower body is worked in long vertical lace rows. That combination is what gives the garment in your photograph its distinctive appearance.
If you tell me your size (S, M, L, XL, etc.) and desired length, I can write out the complete row-by-row pattern with exact chain counts and the flower motif instructions so you can crochet the whole vest from start to finish.