
Scalloped potatoes have a reputation problem. Home cooks see them as fussy. Too much whisking. Too many steps. A béchamel sauce that can break or lump. Layers of cheese and cream that require a culinary degree to get right.
It does not have to be that way.
These Easy Pour-Over Scalloped Potatoes eliminate every unnecessary complication. There is no separate saucepan for a béchamel. No standing over a hot stove whisking butter and flour. No gradual adding of warm milk while praying the sauce does not break.
Instead, you whisk everything together in one bowl. You pour it over raw sliced potatoes. You bake. That is it.
The result is a dish that tastes like you spent an hour at the stove. Creamy. Tender. Golden on top. Rich without being heavy. And so simple that you will memorize the recipe after making it once.
Let me show you how.
Why This Recipe Is a High RPM Winner
Before we dive into the method, here is why these pour-over scalloped potatoes will perform exceptionally well on your blog.
-
No béchamel required. Eliminates a common cooking fear.
-
One-bowl preparation. Minimal dishes and cleanup.
-
Simple ingredients. Milk, flour, butter, salt, pepper, potatoes.
-
Visual appeal. Golden, bubbling, creamy potato slices photograph beautifully.
-
Side dish category. Complements almost any main course.
-
Scalable recipe. Easy to double for holidays or crowds.
-
Beginner-friendly. No special skills or equipment needed.
Ingredients
Servings: 6
-
2 pounds russet or Yukon Gold potatoes, peeled if desired and very thinly sliced
-
2 tablespoons unsalted butter, melted and slightly cooled
-
2 cups whole milk (or 2% milk for a lighter version)
-
3 tablespoons all-purpose flour
-
1 1/4 teaspoons kosher salt (or 3/4 teaspoon fine sea salt)
-
1/2 teaspoon freshly ground black pepper
-
1/4 teaspoon garlic powder (optional, for subtle flavor)
-
1/4 teaspoon onion powder (optional)
-
Butter or cooking spray, for greasing the baking dish
Ingredient Notes for Best Results
Potatoes: Russet potatoes yield the most classic scalloped potato texture. They are starchy and absorb the creamy liquid beautifully while holding their shape. Yukon Gold potatoes are a close second. They have a naturally buttery flavor and a slightly waxier texture that also works well. Do not use red potatoes or new potatoes. They are too waxy and will not absorb the sauce properly.
Whole milk: Whole milk creates the richest, creamiest sauce. You can use 2% milk for a lighter version, but the sauce will be thinner. Do not use skim milk. It lacks the fat needed to create a creamy texture and may curdle during baking.
All-purpose flour: Standard all-purpose flour works perfectly as the thickener. Do not substitute gluten-free flour without adjusting the liquid ratio. Do not use bread flour or whole wheat flour, which will create a gummy texture.
Unsalted butter: Melt the butter and let it cool slightly before whisking with the other ingredients. Hot butter can cook the flour prematurely and create lumps. Unsalted butter allows you to control the salt level precisely.
Kosher salt vs fine sea salt: The recipe provides measurements for both. If using fine sea salt, reduce the amount. Kosher salt has larger crystals and is less dense, so you need more volume to achieve the same salinity.
Garlic and onion powder: These are optional but highly recommended. They add a subtle savory depth without screaming garlic or onion. The dish should not taste like garlic bread. It should just taste more complex than plain potatoes.
Step-by-Step Instructions
Step 1: Preheat and Prepare the Baking Dish
Preheat your oven to 375°F (190°C). Lightly butter or spray a 2-quart baking dish. An 8×8-inch square dish or a similar size works well. A round 9-inch deep-dish pie plate also works. The key is a dish that holds the potatoes in a relatively shallow, even layer.
Step 2: Prepare the Potatoes
Scrub the potatoes thoroughly if leaving the skins on. Peel them if you prefer a smoother, more classic texture. Leaving the skins on gives a rustic, homey feel and adds a small amount of fiber.
Using a sharp knife or a mandoline, slice the potatoes as thinly and evenly as possible, about 1/8 inch thick. Even slices are the single most important factor for success. Thick slices will not cook through. Inconsistent slices will leave some potatoes mushy and others crunchy.
A mandoline is highly recommended for this recipe. It produces perfectly uniform slices in seconds. If using a knife, take your time and work carefully.
Step 3: Arrange the Potatoes in the Baking Dish
Fan the sliced potatoes into the prepared dish in overlapping layers. Spread them out as evenly as possible. Aim for a mostly level surface so the pour-over mixture can coat everything uniformly. Do not pack the potatoes tightly. They need space for the liquid to flow between the slices.
Step 4: Make the Pour-Over Mixture
In a medium bowl or large measuring cup, whisk together the flour, kosher salt, black pepper, garlic powder, and onion powder. Whisk until no lumps of flour remain. Lumps at this stage will become lumps in your final sauce.
Add the melted and slightly cooled butter and a splash of the milk. Whisk vigorously to form a smooth paste. This paste method prevents the flour from clumping when you add the rest of the liquid.
Gradually whisk in the rest of the milk. Continue whisking until the mixture is completely smooth and slightly thickened from the flour. The mixture should look like thin pancake batter.
Step 5: Pour the Mixture Over the Potatoes
Slowly pour the pour-over mixture evenly over the thinly sliced raw potatoes in the baking dish. Gently shake the dish or nudge the potatoes with a spoon so the liquid seeps down into the layers. The potatoes should be mostly submerged. A few edges peeking out above the liquid are fine.
Do not stir the potatoes after adding the liquid. Stirring will break the delicate slices. Gentle shaking and nudging are sufficient.
Step 6: Cover and Bake
Cover the baking dish tightly with aluminum foil. Place it on the middle rack of the preheated oven. Bake for 45 minutes. This covered time allows the potatoes to steam and the flour-thickened milk mixture to start transforming into a creamy sauce. The foil traps steam and prevents the top from browning too quickly.
Step 7: Uncover and Finish Baking
After 45 minutes, carefully remove the foil. Use oven mitts. Hot steam will escape when you lift the foil.
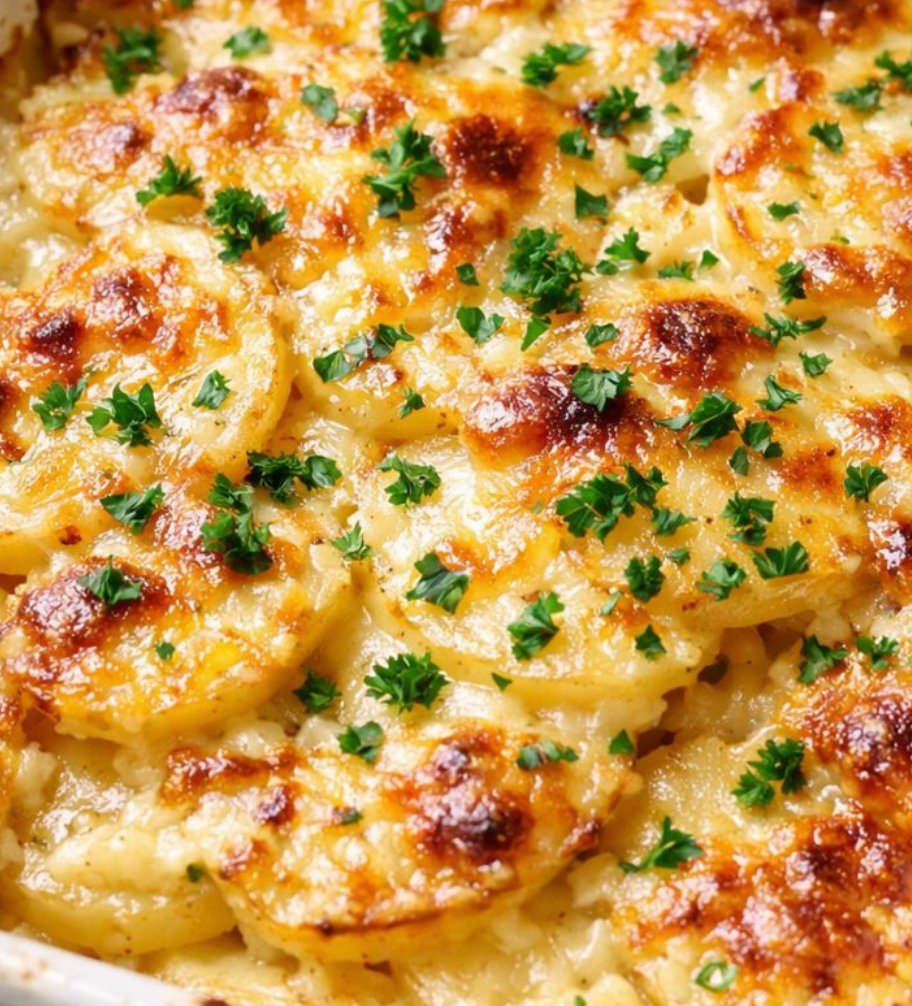
Continue baking, uncovered, for 25 to 35 minutes more. The scalloped potatoes are ready when the potatoes are very tender when pierced with a knife and the top is lightly golden and bubbling around the edges. A knife inserted into the center should meet no resistance.
Step 8: Rest and Serve
Let the scalloped potatoes rest for at least 10 minutes before serving. This is not optional. The rest allows the sauce to thicken and cling to the potato slices. Skipping the rest gives you a soupy, runny dish that falls apart on the spoon.
After resting, serve warm, spooned straight from the baking dish.
How to Serve These Pour-Over Scalloped Potatoes
These potatoes are versatile enough to accompany almost any main course. Here are five pairing suggestions.
With Roast Chicken or Turkey
The creamy, savory potatoes are a natural partner for roasted poultry. Serve alongside a whole roasted chicken, turkey breast, or Cornish hens.
With Ham
Scalloped potatoes and ham are a classic combination. The salty, smoky ham balances the creamy, rich potatoes perfectly. Serve with baked ham, ham steaks, or leftover holiday ham.
With Meatloaf
The creamy potatoes provide a soft, rich counterpoint to a firm, tangy meatloaf. Spoon extra sauce from the potatoes over the meatloaf.
With Pork Chops
Pan-seared or baked pork chops pair beautifully with these potatoes. The subtle garlic and onion in the potatoes complement pork’s natural sweetness.
As a Holiday Side Dish
These scalloped potatoes are elegant enough for Thanksgiving, Christmas, or Easter. They hold up well on a buffet and reheat beautifully.
Variations & Tips
Make It Cheesy
Sprinkle 1 cup of shredded cheddar, Gruyère, or Parmesan cheese over the potatoes during the last 10 minutes of baking. Return to the oven uncovered to melt the cheese.
Make It Herby
Add 1 teaspoon of dried thyme, 1 teaspoon of dried rosemary, or 1/2 teaspoon of dried sage to the flour mixture before whisking in the liquid. Fresh herbs also work. Add 2 teaspoons of finely chopped fresh thyme or rosemary.
Make It With Cream
Substitute half of the milk with heavy cream for an extra-rich, decadent version. Use 1 cup whole milk and 1 cup heavy cream instead of 2 cups of milk.
Make It Dairy-Free
Use unsweetened plain almond milk or oat milk instead of whole milk. Use vegan butter instead of dairy butter. The sauce will be thinner and less rich but still delicious.
Make It With Ham or Bacon
Layer 1 cup of diced cooked ham or 1/2 cup of crumbled cooked bacon between the potato layers. The salty, smoky meat adds another dimension of flavor.
Make It Au Gratin
For a classic potatoes au gratin, sprinkle 1 cup of shredded Gruyère or cheddar cheese between each layer of potatoes and another cup on top. Follow the same baking instructions.
Pro Tips for Absolute Success
Use a mandoline. Uniform slices are the difference between perfect scalloped potatoes and a disaster. A mandoline costs less than twenty dollars and pays for itself in consistent results.
Do not skip the rest time. The potatoes are done when a knife slides in easily, but the sauce is still loose. The rest time allows the sauce to thicken as it cools slightly. Ten minutes is the minimum. Fifteen is better.
Slice the potatoes just before assembling. Sliced potatoes exposed to air will turn brown. If you must slice ahead of time, submerge the slices in cold water and refrigerate. Drain and pat dry before using.
Do not overfill the baking dish. The liquid needs room to bubble and thicken. Fill the dish no more than three-quarters full.
Let the butter cool slightly before adding to the flour mixture. Hot butter can cook the flour and create lumps. Warm butter is fine. Boiling hot butter is not.
Use a glass or ceramic baking dish. Metal pans can react with the milk and create off-flavors. Glass and ceramic conduct heat evenly and are non-reactive.
Check for doneness with a knife. The visual cues are helpful, but a knife is definitive. Insert a thin-bladed knife into the center of the dish. It should slide in with no resistance. If you feel crunch or grit, bake for another 10 minutes.
Frequently Asked Questions
Can I use pre-shredded potatoes or frozen potato slices?
No. Pre-shredded potatoes (like hash browns) are too thin and will become mushy. Frozen potato slices often contain preservatives that affect texture and flavor. Start with fresh whole potatoes.
Why are my scalloped potatoes runny?
The most common cause is not resting the dish before serving. The sauce thickens significantly as it cools. Another cause is using milk with too low fat content. Whole milk or a cream-milk mixture produces the thickest sauce.
Why are my potatoes still crunchy?
Your slices were too thick, or your oven temperature was too low. Thin, uniform slices are essential. Check your oven temperature with an oven thermometer. Many ovens run cooler than the set temperature.
Can I make this recipe ahead of time?
Yes. Assemble the dish completely but do not bake it. Cover tightly with foil and refrigerate for up to 24 hours. When ready to bake, add 10 to 15 minutes to the covered baking time since you are starting from cold.
Can I freeze scalloped potatoes?
Freezing is not recommended. The texture of the potatoes and the sauce will degrade significantly upon thawing. The potatoes become grainy and the sauce separates. This recipe is best fresh.
Can I double this recipe?
Yes, but you need a larger baking dish. A 9×13-inch dish works for a double batch. Increase the covered baking time to 55 minutes and the uncovered time to 35 to 45 minutes. The potatoes are done when a knife slides in easily.
My top is browning too fast. What do I do?
Cover the dish loosely with foil for the remainder of the baking time. Remove the foil for the last 5 to 10 minutes to crisp the top slightly.
Can I add cheese to the pour-over mixture?
Yes. Whisk 1/2 cup of finely grated Parmesan or cheddar into the milk mixture before pouring. The cheese will melt into the sauce and create an even creamier result.
The Science Behind the Pour-Over Method
Traditional scalloped potatoes require a béchamel sauce. You melt butter, whisk in flour to make a roux, then gradually whisk in warm milk while stirring constantly. The roux must cook long enough to lose its raw flour taste but not so long that it browns. The milk must be added slowly to prevent lumps. It is a fussy process.
The pour-over method bypasses all of that. By whisking the flour directly into cold milk with melted butter, you create a simple slurry. As the dish bakes, the heat activates the starch in the flour. The starch absorbs liquid and swells, thickening the sauce. The potato starch released from the slices also contributes to thickening.
The result is the same creamy, luscious sauce without the fuss. The only difference is that you never stood over a stove. That is a difference worth celebrating.