
For anyone who grew up in the 1980s or 1990s, the mention of school pizza instantly triggers a flood of memories. The rectangular slice with its perfectly square cheese pull, the slightly sweet and soft crust, the tangy tomato sauce, and those little squares of seasoned ground beef or pepperoni. It wasn’t fancy, it wasn’t artisanal, but it was undeniably delicious and remains one of the most beloved comfort foods of a generation. Now, thanks to the U.S. Department of Agriculture’s archived “Quantity Recipes for School Food Service” from 1988, the authentic recipe for that iconic school cafeteria pizza has been unearthed.
This recipe is your ticket to recreating that exact lunchroom magic in your own kitchen. Using a sheet pan and a “pourable” dough that is more like a thick batter than a traditional kneaded crust, we will replicate that uniquely soft and tender base. Topped with a simple, herby meat sauce and a generous layer of bubbly mozzarella, this school pizza recipe is perfect for feeding a crowd, winning over picky kids, or simply enjoying a massive dose of childhood nostalgia. Let’s head back to the lunch line.
Why You Will Love This Recipe
· Authentic Nostalgia: This is the real deal—based on the official USDA 1988 recipe used in schools across America.
· Pourable Dough: No kneading required. The batter-like dough is incredibly forgiving and easy to spread.
· Soft, Tender Crust: The inclusion of dry milk powder creates that signature soft, bread-like texture, not a chewy, artisanal crust.
· Budget-Friendly: Uses simple, affordable ingredients like ground beef, tomato paste, and pantry herbs.
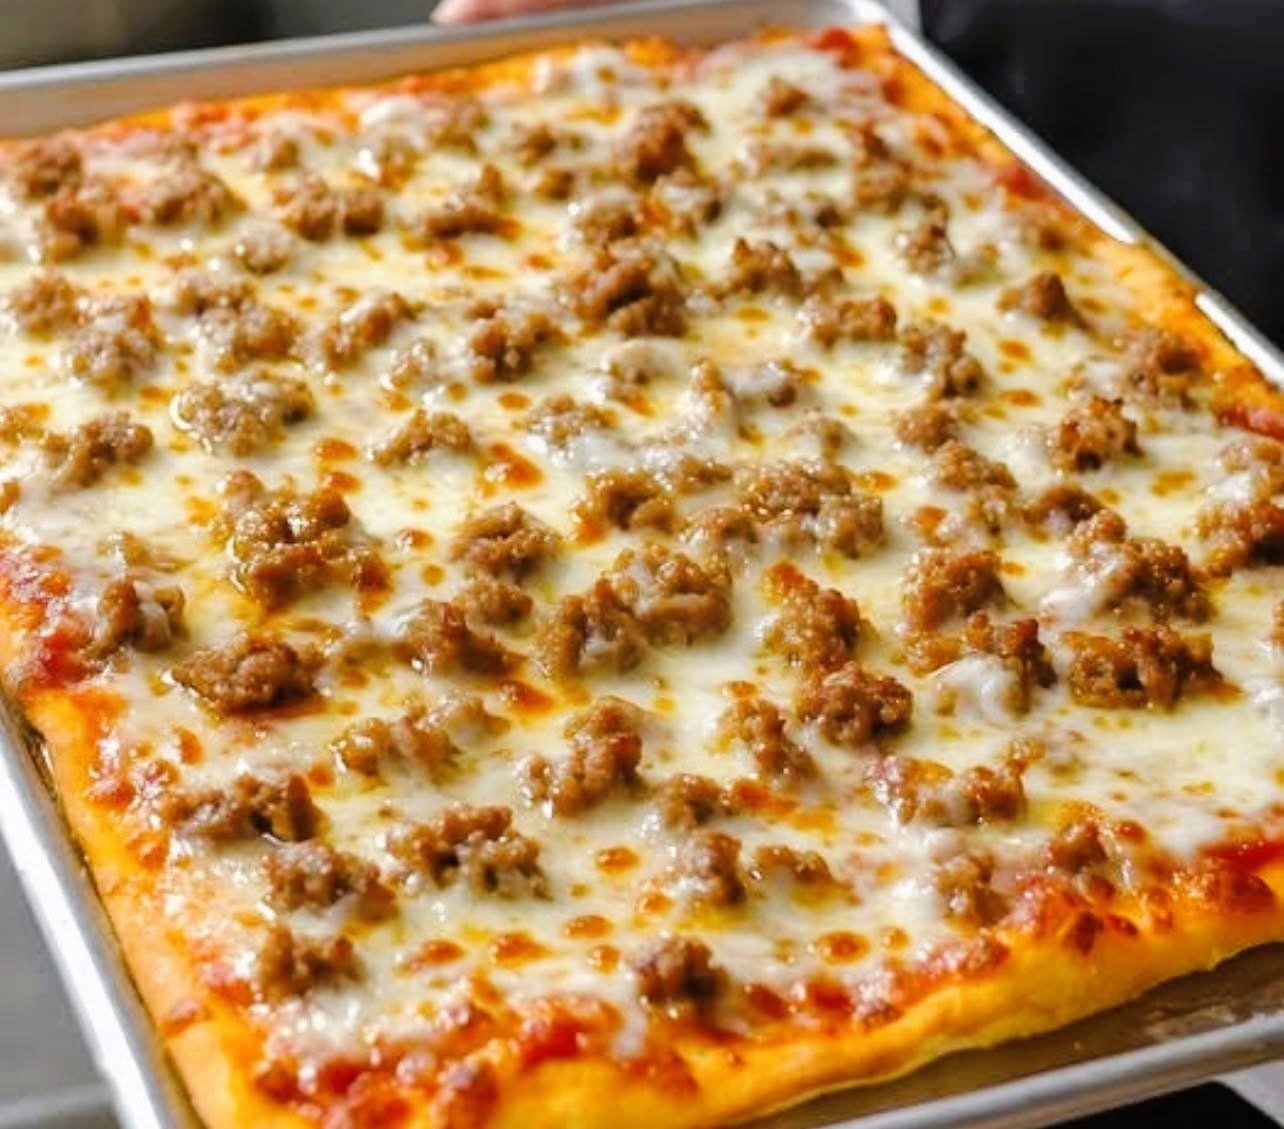
· Feeds a Crowd: Baked on a full sheet pan, this pizza yields 12 to 20 generous rectangular slices.
· Fun to Make: A great weekend project for parents and kids to experience what lunch was like “back in the day.”
Ingredients List
This recipe is scaled down from the massive 100-slice institutional version to fit a standard home half-sheet pan (13×18 inches).
For the Pourable Pizza Crust:
· 4 tablespoons extra virgin olive oil (divided)
· 2 tablespoons yellow cornmeal
· 2 ¾ cups all-purpose flour
· ¾ cup instant nonfat dry milk powder
· 2 teaspoons salt
· 2 ½ tablespoons granulated sugar
· 1 packet (2 ¼ teaspoons) instant or quick-rise yeast
· 1 ⅔ cups warm water (105°F to 110°F)
For the Seasoned Ground Beef Topping:
· 1 pound lean ground beef
· ½ teaspoon salt
· ½ teaspoon black pepper
· ½ teaspoon garlic powder
· 1 tablespoon dried onion flakes (or ¼ cup fresh, finely diced)
For the Sauce:
· 1 can (6 oz) tomato paste
· 1 ½ cups water
· 1 teaspoon dried oregano
· 1 teaspoon dried basil
· ¼ teaspoon dried marjoram (key for authentic flavor)
· ¼ teaspoon dried thyme
· 1 teaspoon garlic powder
· 1 teaspoon sugar
For the Topping:
· 4 cups (16 oz) shredded low-moisture mozzarella cheese
· Optional: ½ cup grated Parmesan cheese for extra browning
Step-by-Step Instructions
Step 1: Prepare the Pan
Preheat your oven to 475°F (245°C). Coat an 18×13 inch (half-sheet) rimmed baking sheet with 2 tablespoons of olive oil. Sprinkle the oiled pan evenly with the cornmeal. This prevents sticking and gives the bottom of the crust a slight crunch.
Step 2: Make the Pourable Dough
In the bowl of a stand mixer (or a large bowl using a wooden spoon), combine the flour, dry milk powder, salt, sugar, and instant yeast. Add the remaining 2 tablespoons of olive oil. While mixing on low speed, slowly pour in the warm water. Mix for 2 to 3 minutes, scraping the sides as needed. The finished dough should be smooth and have the consistency of a thick pancake batter.
Step 3: Spread and Par-Bake
Pour the batter into the prepared pan. Use an offset spatula to gently spread the dough into an even layer covering the entire surface. Let the dough rest in the pan for 10 minutes. Bake the crust on the lower oven rack for 10 to 12 minutes, or until it is just starting to turn golden and is set. Remove from the oven.
Step 4: Cook the Meat Topping
While the crust bakes, heat a skillet over medium-high heat. Add the ground beef, salt, pepper, garlic powder, and dried onion flakes. Cook for 6 to 8 minutes, breaking the meat into very small crumbles (the smaller, the more authentic). Drain the excess fat and set the meat aside.
Step 5: Prepare the Sauce
In a small saucepan or bowl, whisk together the tomato paste, water, oregano, basil, marjoram, thyme, garlic powder, and sugar. Bring to a gentle simmer over low heat and cook for 10 to 15 minutes to allow the flavors to meld.
Step 6: Assemble the Pizza
Spread the sauce evenly over the par-baked crust, leaving just a slight border. Sprinkle the cooked ground beef evenly over the sauce. Top with the shredded mozzarella cheese, making sure to cover the meat all the way to the edges.
Step 7: Final Bake
Return the pizza to the middle oven rack. Bake for an additional 10 to 12 minutes, or until the cheese is completely melted, bubbly, and starting to brown in spots.
Step 8: Cool and Slice
Remove the pizza from the oven and let it rest on a cooling rack for 3 to 5 minutes. This allows the cheese to set slightly, making it easier to cut. Slice the pizza into 12 large rectangles (3 rows by 4 columns) or 20 smaller squares using a pizza cutter.
Cooking Tips and Pro Tips for Best Results
· The Secret Ingredient is Marjoram: While many homemade pizzas rely solely on oregano and basil, the distinct “cafeteria” taste comes from marjoram. Do not skip it.
· Dry Milk Powder is Crucial: It adds richness and tenderness to the crust without adding extra liquid, giving the dough that soft, slightly cakey texture unique to school pizza.
· Keep the Meat Finely Ground: Large chunks of ground beef won’t look or taste authentic. Cook the beef thoroughly and break it into very fine, almost crumbled pieces.
· Sauce Almost to the Edge: Unlike Neapolitan pizza with a big puffy crust, school pizza has sauce and cheese running close to the very edge of the pan.
· The “Double Cheese” Trick: For the ultimate cheese pull, sprinkle about 1/3 of the cheese on the sauce first, add the meat, then top with the remaining 2/3 of the cheese.
· Use an Oven Thermometer: Accuracy is key here. The oven needs to be hot (475°F) to set the pourable dough quickly without it absorbing too much oil.
Variations and Substitutions
Classic Pepperoni:
For those who preferred the rectangle pepperoni squares over the beef, simply omit the ground beef layer. Place a generous layer of sliced pepperoni (or chopped pepperoni sticks, which was common in some regions) directly on the sauce before covering with cheese.
Sausage & Beef Combo:
Use ½ pound ground beef and ½ pound mild Italian sausage (casings removed). Brown them together for a more robust, savory flavor profile.
Whole Grain Adaptation:
To reflect modern tastes or later school lunch standards, substitute 1 cup of the all-purpose flour with whole wheat flour. You may need to add an extra 2-3 tablespoons of water to the dough.
Extra Cheesy:
Sprinkle ¼ cup of grated Parmesan cheese over the mozzarella before baking. It adds a salty, nutty flavor and helps the top brown beautifully.
Serving Suggestions
This sheet pan pizza is a meal in itself, but to truly embrace the cafeteria vibe, serve it with:
· Buttered Corn: A small side of sweet, buttery corn kernels was the quintessential school lunch side.
· Diced Pears or Peaches: Served in a little cup or scooped right onto the tray.
· Chocolate Milk: The ultimate beverage pairing for pizza day.
· A drizzle of Frank’s RedHot or crushed red pepper for the adults who want a little kick.
Storage and Reheating Instructions
Refrigerator:
Store leftover slices stacked in an airtight container for up to 4 days.
Freezer:
Wrap individual slices tightly in plastic wrap and then foil, or place parchment paper between slices in a freezer bag. Freeze for up to 3 months.
Reheating (Crucial for Crispiness):
· Oven or Air Fryer (Best): Reheat at 350°F for 5-7 minutes. This crisps the bottom and re-melts the cheese perfectly.
· Microwave (Quick but soft): Microwave for 45 seconds. The slice will be soft and steamy. If you miss that, place the microwaved slice in a dry skillet for 1 minute to recrisp the bottom.
Nutritional Information (Approximate, per slice – based on 12 slices)
· Calories: 450
· Protein: 24g
· Fat: 21g
· Saturated Fat: 9g
· Carbohydrates: 42g
· Fiber: 2g
· Sugar: 10g
· Sodium: 950mg
· Calcium: 35% Daily Value
· Iron: 20% Daily Value
Frequently Asked Questions (FAQ)
1. Why is the dough pourable and not like regular pizza dough?
That is the authentic texture! School cafeteria pizza utilized a high-hydration, batter-like dough that could be easily poured onto sheet pans and spread without needing to be rolled out. This method was fast and consistent for feeding hundreds of kids.
2. Can I make this without a stand mixer?
Absolutely. The dough is a batter, so a strong wooden spoon and some elbow grease work perfectly. Mix until the dry ingredients are just incorporated and the batter is smooth.
3. Why did my crust turn out greasy on the bottom?
Make sure the oven is fully preheated to 475°F before the crust goes in. If the oven is too cool, the dough sits in the oil and absorbs it instead of cooking instantly. Also, ensure you are using a rimmed baking sheet (half-sheet pan) and not a jelly roll pan with lower sides.
4. What kind of cheese did schools actually use?
Most USDA recipes called for “low-moisture part-skim mozzarella cheese.” It was chosen for its excellent melting properties and relatively low cost. Some regions mixed in Provolone or a little cheddar.
5. Where did this recipe originally come from?
The recipe was rediscovered in a 1988 USDA publication titled “Quantity Recipes for School Food Service.” It was distributed to school districts nationwide, which is why the pizza tastes so similar regardless of where you grew up.
6. How did the meat get those tiny, perfectly square crumbles?
In large-scale kitchens, ground beef was often cooked in big kettles with a specialized mixing paddle that broke the meat into very fine, uniform pieces. At home, a potato masher or pastry blender used while browning the beef in the skillet will help you achieve that same fine texture.